Loading...
Loading...
Loading...
Loading...
Loading...
Loading...
Loading...
Loading...
Loading...
Loading...
How to setup & connect to your server instance
Loading...
Loading...
Loading...
Loading...
Loading...
Loading...
Loading...
Loading...
Loading...
Loading...
Loading...
Loading...
Loading...
Loading...
Loading...
Loading...
Loading...
Loading...
Loading...
Loading...
Loading...
Loading...
Loading...
Loading...
Loading...
Loading...
Loading...
Loading...
Loading...
Loading...
Loading...
Loading...
Loading...
Loading...
Loading...
Loading...
Loading...
Loading...
Loading...
Loading...
Loading...
Loading...
Loading...
Loading...
Loading...
Loading...
Loading...
Loading...
Loading...
Loading...
Loading...
Loading...
This section helps validators ramp up about Harmony staking
For those validators or delegators who would like to join Harmony Open Staking, this section will help you get started and learn about how everything works.
The following links can also help you better understand Harmony's staking mechanism and token economics.
After a validator is elected, each of its elected BLS keys will be semi-randomly assigned to a shard in the network (fully random shard assignment will come in the final phase of mainnet). In the current stage of mainnet, the rule of assignment is simply based on the modulus of the BLS public key’s underlying bytes. For example, with 4 shards, a BLS public key like “xxxxxx8ad5” will be assigned to shard 1 because 5 % 4 = 1. Note that, for each of the elected BLS keys, the validator is obligated to spin up a validator node and validate blocks in the assigned shard.
A validator in Harmony blockchain is a single person or entity who stakes tokens and runs nodes (validator client software) to validate blocks. A validator can specify one or multiple validating keys (a.k.a. BLS keys) which will be used to sign on validated blocks.
To become a validator in Harmony, you will need to do the following:
Setup a validator node(s) and let it fully synchronized with the latest blockchain.
Create an on-chain validator record by sending a CreateValidator transaction.
Start validating using the node(s) with the BLS key(s) you added in your validator record
There are many fields to configure for your validator. It’s worth clarifying some of the important fields in more detail:
amount: The amount of ONE tokens the validator will stake initially.
rate: The commission fee (%) the validator charges from the block reward.
bls-pubkeys: One or multiple BLS public keys the validator will sign with. Each BLS key will be used separately to bid for a slot and if successful, the key is obligated to validate blocks.
BLS stands for Boneh–Lynn–Shacham. It is a digital signature method used for verifying the authenticity of digital messages or documents.
A BLS key represents what the validator signs the blocks with, and is a way of authenticating the validator. A validator can have multiple keys to sign with, this means that a validator is signing blocks in parallel.
BLS keys are attached to validator via:
Creating a new validator (put commas between multiple BLS keys)
Adding new keys to an existing validator (edit-validator --add-bls-key), only one key can be added at a time
An instance is a virtual private server or dedicated hardware with a unique IP address on which a validator runs the node software.
Within each instance, there could be up to 4 BLS keys signing transactions. If you have more than a single BLS key in your instance, it means that you're using the multiBLS feature. If you have a single BLS key in the instance, we will call that single-key instance.
Here are some rules to follow:
In order to use multiBLS feature (multiple BLS keys in same instance), all keys are required to be on the same shard
Total number of BLS keys allowed per validator is 1/3 of total external seats (network level)
Total number of BLS keys allowed per validator can't be more than 6% of total expected external keys in a shard.
Note that validators sometimes choose to run duplicate instances (2 instances, each running with same BLS key) as a backup mechanism.
Below are some differences to using multiBLS vs. single-key instance:
Machine cost will be lower in a multiBLS instance (compare 'validator 2' vs. 'validator 1')
Single-key instances could run nodes for a validator in different shards, whereas a multiBLS instance requires all BLS keys to be in the same shard
MultiBLS and single-key instance have different staking commands
In order to make changes to the keys in a multiBLS instance, the node needs to be stopped and restarted; whereas a single-key instance can be directly added to a validator (since the node is running on a different instance)
Too many BLS keys signing using a single node creates a single point of failure (validator’s risk)
Let’s call the bid price of the elected BLS keys the raw stake. The effective stake of an elected BLS key is a bounded value on its raw stake with a threshold around the median bidder’s raw stake (denoted as median_stake in the picture below). The upper threshold is 115% of the median_stake and the lower threshold is 85% of the median_stake. For a key with raw stake that’s out of bound of the threshold, its effective stake will be bounded by the corresponding threshold, otherwise, the effective stake is the same as the raw stake.
The effective stake of each BLS key is determined at the last block of an epoch during the election process and will stay the same throughout the next epoch.
Effective stake is a new measure introduced in EPoS in order to prevent stake centralization and still provide capitalistic fairness. For exactly how it achieves that, is the design rationale behind it.
In Harmony mainnet, there are 4 shards each producing new blocks separately and in parallel. The block heights between shards are not synchronized so you will see different shards have different block heights.
An epoch is a period of time when the beacon shard (i.e. shard 0, the coordinator for other shards) produces a fixed number of blocks. In Harmony mainnet, an epoch is 32768 blocks (~18.2h with a 2s block time) in the beacon shard. Once an epoch is completed in the beacon shard, that change is also passed onto the other shards, thus all shards are synchronized by epoch.
At the end of each epoch, the committee election process will take place to elect the committees for the next epoch. The election process takes into account all the staking transactions confirmed before the election happens. The election result will take effect immediately, so we encourage all candidate validators to spin up their nodes even before the election happens.
Slashing is an integral component of EPoS which serves as the deterring factor to prevent any non-conforming behaviors from validators such as double signing and being offline.
If validators breach the protocol in the two ways:
Unavailability — a validator temporarily loses his slot if he misses more than 1/3 of the blocks in an epoch; this unresponsiveness is due to nodes being offline, largely not malicious behavior.
Double signing -- a validator loses at least 2% of the stake depending on how many slots are corrupted; this behavior is considered a malicious behavior.
A fraction of the staked tokens is slashed as penalties.Slashing penalties are imposed on both validators and delegators.
The elected validators are obligated to validate blocks with their elected BLS keys. In every epoch, an elected validator should sign more than 2/3 of the signatures that its BLS keys are asked to sign.
The signing performance is represented by a percentage value called uptime. A validator’s uptime is the ratio of the number of signatures its elected BLS keys signed over the total number of signatures the keys should sign. For example, a validator has 2 elected BLS keys and each of the keys is presented 100 blocks to sign. In the final tally, the first key signed 70 blocks and the second key signed 80 blocks. Overall, the validator’s uptime is (70+80) / (100*2) = 75%.
At the end of each epoch, the validators with uptime of no more than 2/3 will have their status set to “Inactive” and be ruled out from the new election. For these inactive validators, they are required to manually set their status to “Active” by sending an EditValidator transaction in order to participate in future elections. We encourage validators to be proactive in maintaining a high uptime to ensure they remain elected and earn the most block reward possible.
If any BLS key(s) are detected signing conflicting blocks (i.e. blocks with the same height and view ID but with different block hashes), the validator will be slashed and forever banned from the network. When a validator is slashed, a certain percentage (i.e. slashing rate) of staked tokens from the validator and its delegators will be forfeited, of which half will be burnt and another half will be credited to the reporter of the double sign event.
The slashing rate is calculated by simply summing all the voting power of the double signing keys with a minimum of 2%. For example, if 3 BLS keys with voting power of 3%, 3% and 4% double signed at the same time, 10% of all staked tokens will be slashed on the validators who hold the 3 BLS keys.
It is NOT recommended now to run multiple nodes using the same set of BLS keys. As we are moving towards full decentralization, external validators will become the shard leader and start to propose blocks. If one validator runs multiple nodes using the same set of valid keys, they may all become valid leaders when the key is rotated to this validator, in this case, the blockchain is experiencing a high risk of hard-fork as different valid leaders may propose different blocks. So, do not run redundant validator nodes anymore on the Harmony blockchain. This is also strictly forbidden on all PoS blockchains such as Ethereum 2, Cosmos.
Cloud provider CPU's are usually shared unless you specifically chose a dedicated CPU or opt for a dedicated bare metal server
Here is a list of Cloud Providers (August, 2020):
Check Cloud Guides for instructions.
Same requirement as validator unless specified below:
Same requirement as validator unless specified below:
Same as above for the type of node you wish to run
A Raspberry Pi 4 with a good Fan and Heat sinker elements will be required Check Raspberry Pi Guide for instructions.
If a delegator decides to stop delegating to a validator, he or she can choose to undelegate their tokens from the validator. After undelegation transaction is submitted, the undelegated tokens will be locked until the end of the current epoch. Note that the unlocked tokens can be used for a new delegation transaction only starting from next epoch. This means the same token can only possibly generate rewards for you starting from the epoch after next epoch. The token will be made available on in your wallet after 7 epoch is passed
| Specs | Shard 0 | Shard 1 |
|---|---|---|
| Specs | Shard 0 | Shard 1 |
|---|---|---|
| Shard 0 | Shard 1 | |
|---|---|---|
CPU
8 dedicated core
4 dedicated core
RAM
8 GB
4 GB
Storage
1 TB (using snapDB) SSD Minimum, NVMe recommended
100GB SSD Minimum, NVMe recommended
Network
50Mb/s bandwidth, 5~6 TB data usage per month
50Mb/s bandwidth, 5~6 TB data usage per month
OS
Ubuntu 22 LTS
Ubuntu 22 LTS
Storage
6 TB SSD Minimum, NVMe recommended
50 GB SSD Minimum, NVMe recommended
CPU
16 dedicated core
8 dedicated core
RAM
32GB minimum 64GB recommended
16GB minimum 32GB recommended
Storage (21 Feb 2024)
32 TB minimum 36 TB recommended
250 GB minimum 500 GB recommended
To launch your AWS instance, follow the steps below.
1. If you don’t already have an AWS account, register one at https://aws.amazon.com.
2. Once you have set up and logged into your AWS account, click on the top left bar “Services -> Compute -> EC2".
3. Click on the blue button “Launch Instance".
4. Select “Amazon Linux 2 AMI (HVM), SSD Volume Type”.
5. Choose instance type “m5a.xlarge” or “m5.xlarge“.
6. Click “Next: Configure Instance Details” at the bottom right corner of the page.
7. Don't change anything. Click “Next: Add Storage” at the bottom right corner of the page.
8. Change the “Size (GiB)” accordingly to the minimum storage requirements.
9. Click “Next: Add Tags".
10. Click "Add Tag." Then, in the “Key” input box put “Name” in “Value” put “Pangaea-key”.
11. Click “Next: Configure Security Group”.
12. On the default SSH with port 22, change the “Source” option to “Anywhere”.
13. Click "Add Rule". Under "Type" select "Custom TCP Rule", under "Port Range" put "6000" and under "Source" select "Anywhere".
14. Click "Add Rule" again. This time, under "Type" select "Custom TCP Rule", under "Port Range" put "9000" and under "Source" select "Anywhere".
15. Click “Review and Launch” and then click "Launch". (Note: Ignore warnings such as “your security group is open to the world” or “your instance configuration is not eligible for free tier”)
16. In the pop-up window you will need to create a new key pair. Select “Create a new key pair” and then enter a name that you like, for example “Pangaea-key”.
17. Click “Download Key Pair” and save the key file somewhere you'll remember.
18. Click “Launch Instances”.
19. Click “View Instances” at the bottom right. Your new instance should be initializing. Wait a few moments for it to get started.
21. Congratulations your instance is up and running! Now it's time to connect to your instance.
1. Open a Terminal window on your computer.
For Mac: If you can’t find Terminal, use spotlight to search for it. Or go to your "Applications' folder, and it should be inside of “Utilities”.
For Windows: Download PuTTY to allow your computer to SSH into the AWS instance. For instructions on connecting to an EC2 instance using Putty follow these instructions from Amazon.
2. Once Terminal is open, use the cd command to change your directory to where the key pair file (Pangaea-key.pem) that you generated is. Hint it may be in your “Downloads” folder.
3. Enter the command chmod 400 Pangaea-key.pem. This command makes your key not publicly viewable.
Note: On Mac, your pem file may have been changed to a .txt file so the correct command on Mac would be: chmod 400 Pangaea-key.pem.txt
4. Go back to your AWS window where you are viewing your instances. Select your new "Pangaea-key" instance and click “Connect” on the top bar.
5. In the pop-up window, under the “Example:” header, copy the sample command to connect to your ec2 instance. The command will look something like:
Now connect to your instance by running the sample command you copied from the “Connect” page in your terminal window.
It may ask you whether or not you want to continue connecting. Type in “yes” and hit enter.
Congratulations! You should be logged into your new AWS instance!
Run the following command to make sure your instance is properly updated:
When prompted whether or not you want to download packages, enter "y" for yes.
You will need to generate one or more BLS keys in order to run a validating node. When generating a BLS key, the CLI will ask you to provide a passphrase to encrypt the BLS key file.
On the command above --count defines the number of BLS keys you want to generate and --shard the shard associated. On this example, we are generating 1 BLS key on shard 1.
Remember your passphrase. You will need it to decrypt the BLS key file in order to create a validator & start a node with that key.
Create a backup of your BLS key file or save the BLS private key (optional).
The BLS public key is the same as the name of the file, without the .key.
1. You need to manually create a folder called .hmy/blskeys:
Make sure all your BLS keys belong to the same shard when using multiple BLS keys. You can use the command below to check each one of them.
3. For each BLS key file, a corresponding <blskey>.pass file needs to be created inside folder.hmy/blskeyswith the passphrase inside it.
following this format :
you should finally have in your .hmy/blskeys folder :
It is NOT recommended now to run multiple nodes using the same set of BLS keys. As we are moving towards full decentralization, external validators will become the shard leader and start to propose blocks. If one validator runs multiple nodes using the same set of valid keys, they may all become valid leaders when the key is rotated to this validator, in this case, the blockchain is experiencing a high risk of hard-fork as different valid leaders may propose different blocks. So, do not run redundant validator nodes anymore on the Harmony blockchain. This is also strictly forbidden on all PoS blockchains such as Ethereum 2, Cosmos.
Connect the UPS to the power supply and let it charge.
Plug in the modem, the swith and the Raspberry into the UPS and access the Modem. Later we need to set up a fixed IP address and port forwarding (TCP 6000/9000/9500) for the Rasperry.
3.1. Install Heatsinker on Raspberry
3.2. Install Fan
3.3. Connect Mini HDMI -> HDMI cable (if you like, otherwise you can use SSH)
3.4. Connect the keyboard (if you like, otherwise you can use SSH)
3.5. Connect Ethernet
3.7. Start the UPS Power for the Raspberry
4.1. Access via Powershell, Terminal or directly via Keyboard and Monitor
4.2. Login: ubuntu / Password: ubuntu
For security reasons Linux requires to change the default ubuntu password.
4.3. Update & Upgrade
During update we can set up a static IP on the Modem and set up Port forwarding.
4.4. Restart
5.1. Download Eeprom
5.2. Restart
5.3. Connect the hard disk and check
5.4. Read out the SSD ID via and write it down
5.5. Mount the hard disk
5.6. Check again with point 5.3 if mount has worked
5.7. Automatically boot from SSD using this script
5.8. Create Quirks driver
In point 5.4. the SSD ID was read out via sudo lsusb xxxx:xxxx
Now connect the hard disk to a computer and add in /boot/firmware/cmdline.txt “usb-storage.quirks=xxxx:xxxx:u” in the first place, without the quotation marks and save. For example for the Samung T7, usb-storage.quirks=04e8:4001:u
5.9. Remove the MicroSD and boot from SSD
Now it should start from the SSD, let it around 20 Minutes so settle down everything, special if you have a bigger SSD.
In case it searches still for MicroSD, write with the Pi Imager «Misc utility images -> Bootloader -> USB Boot to the MicroSD, put it in and start the Rasperry, wait around 15 seconds, remove power and MicroSD and try again.
By starting from the SSD, the password must be changed again. Upon logging in for the first time if the Pi is connected to the internet Ubuntu will immediately/soon start a lengthy update process via snapd and apt.
Make sure you give the system enough time (20 Minutes at least) to finish this process before doing going forward.
7.1. Update by command
7.2. Restart by command
7.3. Change the keyboard to your Language (if wished)
7.4. Restart by command
7.5. Set the time zone
7.6. Restart by command
7.7. Speed testing of SSD via
8.1. Minimize GPU, deactivate Bluetooth, deactivate Wifi and overclocking
Add the following in the config file under [all]
Save via ctrl + x and confirm.
9.1. Change host name
9.2. Create user
Enter your new password and confirm again.
9.3. Give sudo permission
9.4. Check and even extend authorization
9.5. Add the entry for the new user in Visudo
Save via ctrl + x and confirm.
9.6. Terminate old processes and block users
9.7. Change to new User
10.1. Install & activate the firewall
10.2. Open the corresponding TCP ports for Harmony & local SSH from another PC
10.3. Check Firewall
Congratulation you set up your Raspberry Pi and it is ready for setting up as Node!
The Harmony CLI tool is used to interact with the Harmony blockchain.
Make sure NOT to run the Node Setup with theroot user. We recommend creating a new user called harmony for the Node Setup and giving it root level access.
Throughout this guide, we will use the following syntax:
./hmy: This is the CLI program
./hmy.sh -- : This is the command to use the CLI with a shell wrapper (for macOS)
<argument>: This is a required argument
[argument]: This is an optional argument
/ : This is a line break, used to break up a line while writing a command
Now you can use hmy.sh as a wrapper over hmy and you should assume that all references to hmy in these documents refer to hmy.sh. For example, the command ./hmy becomes ./hmy.sh -- .
Note that since hmy is not statically linked, you cannot arbitrarily move hmy.sh to anywhere on your filesystem like you could with a single binary.
On Linux, calling the cookbook would look like this:
And on MacOS would look like:
Frequently encountered errors:
2. Copy all the to this new folder:
It is recommended to set up standby nodes in case the main node is going to maintenance mode. Check out this on how this feature is supported to run and switch backup nodes.
Before setting up Raspberry Pi, check requirements .
3.6. Install Ubuntu Server 20.04 LTS on MircoSD and on SSD. Click for instructions
Code is adapted from an Instruction, check if you need further information’s.
Code is adapted from an Instruction, check if you need further information’s).
Code is adapted from an Instruction, check if you need further information’s).
Code is adapted from an Instruction, check if you need further information’s).
Code is adapted from an Instruction, check if you need further information’s).
Since is not natively supported ARM systems yet, install it on a x86_64 system to . After that, copy them to the same .hmy/blskeys folder on Raspberry Pi.
Continue node setup from onwards.
AutoNode allows you to spin up a node seamlessly and automate common validator actions.
Want to add a feature to AutoNode? Feel free to contribute to the open-sourced repo here!
Using answers for these questions you can easily understand which snapshot type you will need
This document introduces another centralized fast state syncing method using rclone. Please use it with caution. This guide is mainly used for a newly started node to catch up with the blockchain faster. Otherwise, the blockchain syncing may take weeks from genesis block.
Rclone db snapshot is synced with blockchain frequently. However, there maybe a potential race condition when the rclone may fail due to our nodes were updating the db files at the same time. In this case, just re-run the rclone command to re-sync again.
For installing Rclone, please follow the instructions at https://rclone.org.
TL;DR: on a Linux system, you may run the following command:
Make sure your rclone version is above v1.53.2 . you can check version by rclone version
To check the location of the rclone.conffile run:
The rclone.conf file is usually located at ~/.config/rclone/rclone.conf .
Now run the following command to create the rclone.conf file:
The most important parts in bold:
Sync the source to the destination, changing the destination only. Doesn't transfer files that are identical on source and destination, testing by size and modification time or MD5SUM. Destination is updated to match source, including deleting files if necessary (except duplicate objects). Link to the full rclone documentation.
sync command was chosen because you need to have your blockchain data folder to be identical with the snapshot data
As user you need to carefully get the full path to the folder and as destination. If you have some important data in the destination, please move it somewhere else.
Usually data dir folder is `./` which means folder in which harmony is running
You can double check this via:
ls -l | grep 'harmony_db_'
Expected result id is name with shard number on the end, e.x. harmony_db_0.
Q: How to get the full path to the your blockchain data folder if it isn't default?
Check how do you start harmony via ps -ef | grep harmony and check for the --datadir option, if you don't have it go to the following step, else to the 3rd
Check the harmony.conf for DataDir option or check your grep DataDir harmony.conf
Go to the folder from the cmd option if have it or to folder from config if you don't have cmd option, do the following:
SnapDB is a type of DB that contain a snapshot of the state at a given block. It doesn't have any block history and hence not suitable for RPC node.
Below is the command to sync the Snap DB for the shard 0. It is around 100 Gb as of October 2023:
Important: Since this can cause data loss, test first with the --dry-run or the --interactive/-i flag.
Small explanation for flags used to save your time with rclone manual:
Since v4.3.12 shard 1 doesn't need to download anymore shard 0 DB. Instead, the node will download automatically the blocks required for the node in shard 1 to work.
Each node will simply need to rclone its own DB.
Important: Since this can cause data loss, test first with the --dry-run or the --interactive/-i flag.
Important: Since this can cause data loss, test first with the --dry-run or the --interactive/-i flag.
As of 1st October 2023, the size for the shard 0 on mainnet is ~23TiB. Note that the bucket is currently not fully synced.
Please contact us at devops@harmony.one if you need to access our archival db.
If you want to quickly test your validator/RPC setup via the testnet network, please use the setup from #id-2.-configuring-rcloneand the info below.
Important: Since this can cause data loss, test first with the --dry-run or the --interactive/-i flag.
Important: Since this can cause data loss, test first with the --dry-run or the --interactive/-i flag.
As per instructions on the cloud guides, the host needs to open up port 9000 for blockchain consensus messages and port 6000 for blockchain state syncing. Other ports are NOT necessary for syncing and should NOT be opened to the internet if you are staking only.
9000 port is used for blockchain consensus messages (base port)
6000 port is used for blockchain state syncing (base port - 3000)
9500 port is used for SDK RPC service (base port + 500)
9800 port is used for Websocket service (base port + 800)
The 9500, 9800 ports are only listened by localhost 127.0.0.1 by default.
Before we proceed to next steps we need to download the node binary first:
Check the node binary version that was downloaded:
The below explain the different method the node binary can be used. Option 1 is what being used when setting up systemd (at step 2).
If you choose another method make sure to use the correct command line
All the start options can be persisted and loaded from a single config file. To start a node, the following steps are also available**:**
Dump the default config.
Customize the config file.
Run harmony node with the config file.
A file harmony.conf is created and the default node options are set in the file in TOML formatting. Here is an example:
The content of the config file can be modified for custom node start up command.
For example, to open the public HTTP RPCs, change the field IP under [HTTP] tag to "0.0.0.0":
To run harmony internal nodes under legacy mode instead of staking mode, change the field NoStaking under [General] tag to true:
To enable streamsync, modify the below two sections (Experimental. use at your own risk)
Stream Sync is the new harmony P2P syncing method allowing to get rid of the previous sync via DNS causing issue when the DNS
Harmony node binary is able to start with options provided by the config file:
The values stored in the config file will be read and parsed to harmony as node start options.
You can run your node binary using flag parsing:
A full list of active flags as well as examples can be accessed through running the binary with --help option:
Output:
If both config file and flag is provided, the node option stored in config file will be override by the values given in flag.
For example, In config file harmony.conf, HTTP server is enabled, and is open to public:
And a flag is also provided during the node start command to disable the HTTP server:
In this case, the command line flags will override the settings in the config file and thus the HTTP server is disabled.
The above steps would have you started the node, please CTRL+C, so you can continue with step 2.
A Non-validating Node is a node that does not join the consensus.
Check here for Explorer Node requirements.
Check here for instructions on how to sync your node in archival mode.
Keep in mind that the storage space used increases around ~50+ GB per month on s0 due to staking transaction being stored. Other shard should take around 25GB per month. Please plan your storage space accordingly.
The following steps assume the node is connected to mainnet on shard 0, which is required for all exchanges.
If you are using the config file, which is the recommended way to configure your node, change the settings to the ones below:
NoStaking = true will verify if the BLS keys in your .hmy/blskeys folder are part of the original FN keys. You will need add in the folder dummy empty files and remove all others
IsBeaconArchival flag is applicable to explorer node only. For shard 1/2/3 the beacon shard 0 doesn't need to be in archival mode. So to save space, the recommendation is to set to false. For shard 0 explorer node, IsArchival flag will determine if the database is in archival mode or not.
DataDir (or --db_dir below for cli flag) is the folder where the blockchain data will be store (ie location of harmony_db_0)
Alternatively, you can also run it using flag parsing:
Make sure to follow the upgrading Explorer DB schema process here afterwards. This fixes a critical issue on Explorer DB.
On this example, we will be installing the harmony daemon for user harmony on its home directory. Daemon will be configured with sudobut it will run with the harmonyuser at the end.
Create the harmony.service file:
Add the content below to the file and save it. Change User to the local user you will be running the daemon and also WorkingDirectory to the home directory where you downloaded the harmony binary file previously. Parameter ExecStart needs to point to this same directory. On the example below we will be running the harmony binary using the harmony.conf file.
Give the necessary permissions to run the daemon service, enable it and start it:
If you want to check the status of the daemon you can use:
To restart, or stop the service daemon you can run:
To check your node follow instructions on Checking A Node.
Run the latest AutoNode!
AutoNode will quickly check for an update on each execution of the auto-node command. If there is an update you will see the following message:
You will need to briefly stop your node to execute an update. Updates should be fast.
Kill your AutoNode with the following command:
Note that if you are still elected and signing, AutoNode will ask for you to confirm before killing your node.
You can start the update with the following command:
Note that AutoNode will check to make sure the harmony node is stopped. If it detects that the harmony node is still running, It will ask to kill itself before starting the update.
You can also re-run the install script from step 3 of the Install & Run script to update AutoNode
Make sure to restart your AutoNode after the update to resume validating or operations. For a validator, it will most likely be:
DO NOT restart AutoNode with the
--cleanor--fast-syncas it will probably regress your block hight (since it edits the DB files).
hmy CLIManage & re-use your BLS keys.
Currently, all BLS keys MUST have the same passphrase. A feature to improve this is in the works.
You can find the path to your BLS keys directory (used by the harmony node) with the following command:
By default, this should be
~/.hmy/blskeys
Any BLS key present in that directory will be attempted to be used when launching the node. This means that all BLS keys in the said directory need to be for the same shard. Moreover, any .passfiles will also be attempted to be used when launching a node
This assumes AutoNode has been initialized.
You can find which shard a public BLS key belongs to with the following command:
You can automatically cleanse your validator of BLS key(s) that have not signed any blocks in the current epoch with the following command:
You can cleanse all BLS key(s) that are not on the same shard as the BLS key(s) used by the current harmony node's shard with the following command:
You can also cleanse the BLS key(s) that are not being used by the current harmony node with the following command:
You can remove an explicit BLS key from your validator with the following command:
Quick start to running a Harmony Validator.
All commands for auto-node have a help message that describes its usage. Just append --help to the command you wish to learn more about. For example: auto-node --help.
It is recommended to go with Ubuntu 18+ or Red Hat Enterprise Linux 8+ as your operating system.
You can choose any <new-user-name> you want. The command below will ask for a passphrase for the user, choose one and keep track of this password for future use! The command below will also add the user to the sudo group for convenience.
Answer the prompts, then execute:
Next, if you wish to use the same SSH credentials as your current user to log into your new user, execute the following commands:
Command above assumes you use the default home directory for your new user
Lastly, exit your SSH session and re-SSH back into your machine under your new user. Your ssh command may look something like this:
Alternatively, you can swap users when SSH-ed in as your default user with the following command:
If you choose to swap users, you must export 2 environment variables to install AutoNode. Do so with the following command:
It may be convient to add this command to your
~/.bashrcprofile.
sudo access for your user is needed for installation.
Make sure to answer the prompts!
You will need to have access to systemd in user mode. This may require SSH-ing in as the user running AutoNode, or upgrading systemd. It may be easier to choose another Operating System if you have to upgrade systemd, Ubuntu 18+ is known to work.
If you created a user just for AutoNode, make sure to follow all parts of step 2.
You can reload your shell by exiting your SSH session and SSH-ing back into the machine, or you can execute the following command:
This step is only needed if the command:
auto-nodedoes not work.
You can use the following command to list all of the loaded wallets:
Use --clean to start fresh/remove old node files (if present)
Use --fast-sync option to rclone the correct Harmony DB to reduce sync time. One can choose to sync from scratch by removing the --fast-sync option
Use --shard (your shard number here) to run a node for a specific shard
Use --archival to run in archival mode. Make sure your machine has enough space. We expect around 500GB is needed to run an Archival node (Jun 2020)
Use --auto-active to automatically activate your validator on next epoch in case it gets deactivated
Make sure to respond to the prompts. If you are unable to create a validator (but started your node) don't worry! Follow the next step on how to create your validator.
Once the monitor has started and you see repeated prints of the node information & headers, you can exit with ctrl+C.From here, you are free to do whatever on the machine, or you can exit the machine. Your Harmony node will keep running!
You can go through the create validator flow again by executing the following command:
Note that this can only be done if you failed to create a validator on the inital run of auto-node
Track your node's status with AutoNode.
If any of the commands activates a monitoring screen, you can always exit using Ctrl+C.
View live updates (at 8 seconds intervals) of your node's status (block height, EPOS status, etc..) with the following command:
View an overview of your validator and node with a text-based user interface. You can start it with the following command:
You can view the status of the harmony node with the following command:
You can also view the logs from the node as it was initialized with the following command:
Should the monitor crash or timeout, you can restart it with the following command:
You can update the TUI to the latest release with the following command:
Get your ONEs for validating!
You can simply collect rewards for your validator with the following command:
If you have followed the recommended method of creating a wallet just for running a validator, you can send funds to your 'main' wallet with the following steps.
First, get the balance of your validator wallet with the following command:
Note the shard 0 balance, this is where the rewards get deposited.
Next, transfer the funds to your 'main' wallet with the following command:
Substitute
<main-wallet-address>with the ONE address of your main wallet. Substitute<amount>with how much you want to transfer from your validator wallet.
For your convenience, AutoNode wraps the hmy You can update it with the following command:
This option is deprecated and is not supported anymore. Please setup your node .
Otherwise, you can create your own SSH key for your user following documentation.
Use --expose-rpc if you wish to expose for your node to enable endpoint functionality
Some steps for troubleshooting your AutoNode.
If you encounter any issue you cannot solve, feel free to reach out to us at autonode@harmony.one. Alternatively you can open a Github issue here.
All AutoNode generated logs are saved in $HOME/.hmy when you execute the following command:
You should see 2 files, autonode_monitor.log and autonode_node.log. Inspect those two files with your favorite command-line editor (i.e: vim) to see where things might have gone wrong.
You might also find it useful to inspect the Harmony Node logs. You can do so with the following command:
You can change the
vimpart of the command for your favorite text editor.
A symptom of this is seeing an error to connect to http://localhost:9500/.
You can inspect what went wrong with the following command:
A common issue is that your machine will not have enough disk space. You can check your disk space usage with the following command:
If your
use%is at 95-100% and your node failed to start, you probably have insufficient disk space. Look into how to increase your disk space on your cloud provider.
You can also try to reboot your AutoNode with:
Substitute
<params>with whatever run params you want to use.
Sometimes the Harmony Node may have some signing issues. In this case, we have found it best to just restart the Node. You can do so by first killing AutoNode:
Then restarting AutoNode with whatever your initial run command was. For example, one could run it with:
DO NOT re-run with the --clean or --fast-sync options as they will most likely regress your block height to the last snapshotted DB.
You can restart the Harmony Node service with the following command:
You can check the status of the service with the following command:
You can fetch the Harmony Node version with the following command:
You can restart the monitor service with the following command:
You can check the status of the service with the following command:
If your encrypted passphrase for your validator is ever invalidated, you can re-encrypt and save it with the following command:
You can choose to optimize your operating system for running a harmony node. The optimizations, or tunes, are made to keep your node safe but also lifts some default restrictions. Here is the command to tune your OS with AutoNode:
This will tune the kernel and the
--saveoption will make it persistant. If you do not have the--saveoption, the tunes will only last untill the system is rebooted (by you or your VPS). Note that all the tunes will be displayed and confirmation asked before applying the tunes.
You can also tune/optimize your network settings with the following command:
If you want to revert the optimization/tune applied by AutoNode, you can do so by running the following command:
Note that you can run the command muliple times to restore previous tunes chronologically. Moveover, the restored tunes will be displayed and a confirmation will be asked before applying the restoreation.
First, remove all of the AutoNode files. You can do so with the following command:
After, you can re-install AutoNode from fresh using the steps in the Install & Run section.
Some optional extras that you may find useful.
We do not recommend storing your passphrase in plain text. If you choose to, you can have AutoNode import your wallets passphrase from a file. First, save the passphrase using the following convention:
Then, move the saved passphrase into the harmony wallet passphrase directory using the following command:
Then, when you run AutoNode with auto-node run it will automatically pick up the passphrase.
Steps for maintaining your node with AutoNode.
After your validator is created, you can edit your validator config with the following command:
This will open up a Nano session to edit the config. After you do your edits, save it by pressing
Ctrl+XthenY.
After you finish editing, you will be asked to update the config on-chain. If you say yes, AutoNode will send an edit validator transaction to update your validator.
Note that the following are the ONLY fields that can be edited on-chain:
"details", "identity", "name", "security-contact", "website", "max-total-delegation", "min-self-delegation", "rate"
You can deactivate your validator if you would like to not get elected the following epoch. You can do so with the following command:
When you are ready to get elected and sign the following epoch, you can activate your validator with the following command:
Node logs are saved in the following directory: $HOME/harmony_node/latest
You can view the logs with the following command:
The Harmony Node is ran as a service, you can inspect the logs for the service with the following command:
Similar to the Harmony Node, the monitor is ran as a service and you can inspect the logs for the service with the following command:
This option is deprecated and is not supported anymore. Please update your node Using Node Binary.
For instructions on how to update Using AutoNode click here.
Create a folder called "backup" in case it does not exist:
Backup the harmony binary file:
Before we proceed to next steps we need to download the node binary first:
Check the node binary version that was downloaded:
To check your node follow instructions on Checking A Node.
Requirements for Explorer Nodes have changed. Check here before going forward.
Change harmony.conf file and add make sure the RPC Rate Limit is set to at least 50000:
DB migration should take no more than a few hours to conclude.
To check the node version that is running, run the command below:
1. To check if your node is syncing properly, run the command below and check that the block height of the shard(s).
Harmony relies on a beacon shard chain (aka shard 0) to facilitate cross shard transaction. For the node to be fully working both your non shard 0 and shard 0 needs to be fully synced.
2. Before continuing, check if your node is fully synced using an external endpoint. Replace parameter --node with the enpoint you want to compare with. Check the examples below for shard 0 on mainnet and testnet. Just change the edpoints to do the comparison with other shards.
For a complete reference of all available enpoints on both mainnet and testnet, please click here. Alternatively you can use the Block Explorers for a visual comparison.
3. Verify if blocks shown on steps 1 and 2 are closer or equal to each other. If so, your node should have caught up!
How to update your validator information
You can edit your validator’s information using the CLI with the following command:
The CLI will prompt you to enter your BLS key file password. Only the --validator-addr field is required; all other fields are optional.
--validator-addr is the validator ONE address that you want to edit (string)
--active to set validator as eligible or not to be elected (bool)
--name to change the name displayed on the Staking Explorer (string)
--identity to change the identity field (string)
--website to change the website field (string)
--details to change the details field (string)
--security-contact to change the security contact field (string)
--rate to change the current commission rate (float)
--min-self-delegation to change the minimum stake by the validator (float)
--max-total-delegation to change the maximum stake that the validator can take (float)
--remove-bls-key to remove a BLS public key associated with your validator (string)
--add-bls-key to add another BLS public key to your validator (string)
When you add or remove keys from your validator (using--add-bls-key or --remove-bls-key) make sure to restart the harmony service so it accounts for the BLS keys you are using.
--validator-addris the only field that is required.
Sending the command without the arguments will leave those fields of your validator as is.
--max-rate and --max-change-rate cannot be changed after creation.
--min-self-delegation must be at least 10,000 ONE.
You can interact with your validator directly via HMY CLI. Check the links below for more information on how to do this.
How to undelegate your tokens from a validator
You can un-delegate tokens from a validator using the following command:
The CLI will ask for the passphrase for the delegator-addr keystore file.
--delegator-addr is the ONE address of the delegator (string)
--validator-addr is the ONE address of the validator (string)
--amount is the number of ONE tokens to un-delegate (float)
As a validator, for un-delegating from your own validator, delegator-addr and validator-addr will be the same.
When you decide to un-delegate your tokens from a validator, your tokens will be released at the end of the epoch from when you un-delegate.
This means that you will NOT have access to these tokens and can NOT transfer them after choosing to un-delegate your tokens from a validator until the tokens are in your account.
If your validator didn't get elected in the last epoch, you will get the token back at the end of current epoch.
How to collect your rewards
Upload a custom logo to be displayed on your Staking Dashboard profile
Login to your Keybase account or create a new one.
On your profile, if you don't have a PGP key set yet, just click on "Add a PGP key" to create or import an existing one.
Once you have created it just click on it like it is shown on the example below:
Once you click on it, Keybase will open a new page. Click on the link "this key":
This will open a new page with the PGP public key finger print:
Use the following command to update your validator identity with the keybase fingerprint.
Enter the passphrase when prompted. Just wait 10 min and your Keybase profile picture will automatically be used for your validator image on the Staking Dashboard!
This option will be deprecated and is not recommended anymore. For now, we still maintain compatibility with it, but we urge users to migrate to Option 1: Using Keybase.
1. Fork this github repo: https://github.com/harmony-one/validator-logos
2. Add your logo by creating the logo image name using your Harmony one address as the file name and placing it inside "validators" folder. The logo image needs to be a .jpg file with 256x256 pixels or 512x512 pixels. Example: validators/one1pdv9lrdwl0rg5vglh4xtyrv3wjk3wsqket7zxy.jpg
Do not upload the .jpg file in the main repository directory. It must be inside the "validators" directory.
3. Create a pull request for your changes. A Harmony team member will review the image & approve it.
Definition of validator information terms
This page introduces main terms about validator infos in the harmony-mainnet-tracker spreadsheet, you can also read some of the terms in staking dashboard.
Annual Percentage Return (APR) is the percent return of rewards for the last epoch that the validator was last elected.
This field reflects the data of the last epoch this validator elected, not the current epoch.
For example, if a validator was elected in epoch 186 with 50% APR and they were never elected again, they will still display 50% APR.
Latest expected return is the validator's APR for the latest epoch.
The Expected Return field here is average of the validator's APR for the past 30 epochs that they were elected.
Validator uptime is calculated as:
Where s is the number of blocks signed by the validator and b is the number of blocks in the epoch so far.
If a validator has never been elected, their uptime will display as None in the tracking spreadsheet. In the staking dashboard, their uptime will be 0.00%.
Similarly to APR, uptime is also only updated if the validator is currently elected.
For example, if the same validator was elected in epoch 186 with 100% uptime and they were never elected again, they will still have 100% uptime displayed.
There are five types of data in this field:
eligible to be elected next epoch
not eligible to be elected next epoch
currently elected
doubleSigningBanned
unknown
Epos status is based on the validator's active status. The validator's active status will be controlled either by user or system (if detected low uptime or 0 self-stake). However if the validator is never elected, as long as he set the validator status as active, he will always be shown as "eligible to be elected next epoch".
There are five types of the data in this field:
NotBooted: if the validator was never selected/signed blocks.
LostEPoSAuction
TurnedInactiveOrInsufficientUptime
BannedForDoubleSigning
None: when the validator is currently elected
The Staking Explorer is an easy way to stake, delegate, send funds and view all information of Harmony validators.
You can explore the dashboard without using your ONE address, but the ONE address you use will be used for any transactions.
You can log into an account using Metamask, MathWallet Chrome Extension, or a Ledger.
After logging in, you can view network analytics, a list of validators, validator profiles, and other information to help you decide who to delegate to.
Every transaction or delegation must be signed with your preferred wallet supported by the staking dashboard
Here is the Staking Explorer link:
Wallets:
Helpful information to keep your validating node secure
This section will teach you about improving the security of your validator. As a validator you play a crucial role in securing and decentralizing the Harmony network. The security of the network is compounded as a sum of all validator's security. Therefore is very important that every single piece in the chain is as secure as possible.
Depending on your configuration, if you have the BLS key on your validator server and maybe also the password to decrypt it, for example in order to restart your node automatically, it is strongly recommended that you secure the access to your validator as much as possible.
Using 2FA and other security measures can substantially improve the overall security of your validator. The state of the art for 2FA is to use a HSM module like YubiKey.
Very important: it is highly recommended to have two YubiKeys associated to ensure one is not locked out in case a YubiKey is lost, stolen, or breaks.
In case you find YubiKey an expensive solution, other methods for 2FA can be used, like your phone or authenticator apps for example.
Very important: Be aware that SMS based 2FA authentication methods are not secure and not recommended as one could hijack your smartphone’s SIM. Doing this hackers can redirect any two-factor notifications to their own devices.
Hardware Security Modules (HSMs) generate, manage and store the secure cryptographic keys that are required for authenticating an user or device in a broader network. Malware attacks and remote extraction of private keys are much more difficult when a HSM module is configured properly. When you have your private key on your validator that is secured only by a password, an attacker can simply copy your private key and sign malicious transactions or generate double signs which can result for example in stake slashing or other unwanted operations on your node. By using Two-Factor Authenticator (2FA) and HSM module, you are strengthening the authentication on your Virtual Private Server (VPS). There are many options for 2FA but is recommended that you actually use a HSM module like YubiKey for this. Even better would be to use certificate in combination with a HSM module in order to authenticate and disable password login.
Serious VPS providers allow this already and also to use a HSM module like YubiKey. This guide focuses on Vultr but the documentation for YubiKey activation can be found in the documentation of different VPS providers, e.g. Hetzner: https://wiki.hetzner.de/index.php/KonsoleH:Zwei-Faktor-Authentifizierung/en
Activate 2FA with YubiYey for Vultr
In order to use YubiKey Authentication, you need any of Yubico’s Yubikey USB devices. Next, you would need to login to your Vultr Account: Click Account -> Authentication -> Manage Two Factor Auth: https://my.vultr.com/settings/twofactor/
Under Add new authentication method, select YubiKey, enter a description of your choice in the next field, then click Add.
In the next page, you will need to make sure your YubiKey device is plugged into one of your USB Ports on your computer. You will be presented with a text field in which you need to click, then press the button(s) on your YubiKey Device, or touch the edge of the device if you’re using a YubiKey Nano, then click Update.
In the next page, you will need to repeat the previous step to re-enter a secondary token, then click Update.
When you are finished, log out of your Vultr account. Then attempt to log back in. You will be asked to enter an authentication code. Insert the YubiKey device in one of your computer’s USB ports, and either press the button(s) or touch the edge of the device.
On Windows you can use for example PuttyGen to generate your SSH Public-Private Key pair. Setting a passphrase is advisable as it offers another layer of security if your ssh keys will be compromised.
Popular algorithms for creating SSH Keys:
RSA: It depends on key size. It is recommend to have 3072 or even better 4096-bit length. The 1024-bit length is considered unsafe.
Ed25519: It’s the most recommended public-key algorithm available today but you have to check with the cloud provider, e.g. Vultr, Hetzner, AWS if is supporting this.
To generate the SSH keys on macOS or Linux, use the Terminal and the command below.
If your VPS doesn't support automatically the SSH authentification at the creation, you can add manually your SSH key to your server later on.
Then, on your server, edit the "sshd_config" file to disable the password authentification.
Restart the sshd service.
Login to your server using your ssh key.
Make sure to back-up this password and also be aware where you place it so that it won’t get stolen.
Very important: For holding passwords, keywords, etc. an encrypted hardware device and paper wallets are recommended. It is not recommended to hold passwords or keywords on a hot storage like your personal computer or notebook.
For Debian based systems like Ubuntu or Debian use the command below:
For Amazon Linux use the command below:
It is not recommended to use directly the root user on your VPS. Therefore create a new user:
Add the newly created <your-username> user to the sudo group:
You can switch to the new user with the following command:
Add the public key to your new created user
First add the PPA and install the library.
Let’s add pam settings for SSH.
Add the following line at the top to enable the module:
You can use the following link in order to get the API Client ID and the API Client Key: https://upgrade.yubico.com/getapikey/
To improve the security you should comment the following line out:
This way the YubiKey is required to authenticate without a possibility to fall back to providing the password.
Result:
Save the file and exit -> press Ctrl+X and then press “y”
Next step is to create a mapping file where you define which YubiKey device is assigned to which user of your VPS.
The mapping file contains users and YubiKey identifiers. The YubiKey identifiers are always the first 12 characters of the generated YubiKey token. In order to generate the YubiKey token you just tap your YubiKey. Then you select its first 12 characters. In case you have multiple YubiKeys you can also add multiple.
Add the mappings for each user:
Save the file and exit -> press Ctrl+X and then press “y”
Next step is to update sshd_config file to authenticate via public key and pam.
Following changes need to be made:
Enable challenge response authentication by changing it to “yes”
ChallengeResponseAuthentication yes
Add a new line that sets the Authentication Methods to require first the public key to be valid and then the YubiKey token for each user.
AuthenticationMethods publickey,keyboard-interactive:pam
UsePAM yes
Disable the password authentication by removing “#” in front of this line:
PasswordAuthentication and set the value from yes to no
Disable root authentication - if you have created a separate user for your application, deployments, etc. you can also disable the SSH root user access, which will add an extra layer of security to your VPS. Find the line PermitRootLogin, remove the comment sign “#” from the beginning of it and set the value to no
Change your SSH port from 22 to another one, for example 2225.
Don’t use any of the ports in this list: https://en.wikipedia.org/wiki/List_of_TCP_and_UDP_port_numbers , as they are already being used.
Example sshd_config file - take it only as reference to see the security changes and don't copy it!
Save the file and exit -> press Ctrl+X and then press “y”
Finally restart the sshd service to update the settings.
Test the configuration It is recommended to keep the current session active. In case something went wrong, you will still have access to your VPS and be able to make changes.
Create a new ssh connection and check if the SSH login with certificate and YubiKey works. First the certificate will be used and then you will be prompted for YubiKey. Once this is the case just tap your YubiKey to enter your token and login.
Example:
9. Install fail2ban to reduce brute force attacks
Start and enable the service
It is recommended to use a separate jail.local file to actually read your own configuration. For that first you have to copy the basic configuration jail.conf to the local one jail.local. The new file jail.local will override the original settings in jail.conf.
Edit the file jail.local
This configuration will block an IP address that is being used to log into your VPS via SSH, port 22 and fails for 5 times.
Save and close the file -> press Ctrl+X and then press “y”
Restart fail2ban to activate the settings
10. Configure system firewall with IPtables More about it can be found here: https://www.tecmint.com/linux-iptables-firewall-rules-examples-commands/ 11. Monitor and manage your system and process by using htop
Install htop
Run htop
11. Deactivate VNC (Contabo)
Some cloud providers (such as Contabo) have the VNC option activated by default. It is recommended to disable it if you don't use it.
Verifying your node's chain synchronization
To check whether your node is synchronized with the leader, there's a built-in endpoint at port 5000 called /node-sync. It returns a boolean flag true or false to indicate whether your node is caught up to the latest block, on par with the majority node-runners.
This endpoint can be used to feed into your favorite dashboard metrics (Grafana, CloudWatch, etc.) and trigger alarms (Healthchecks.io, UptimeRobot, PagerDuty, webhooks into Discord, etc.) that can to help monitor your node operations. If you're running a node service to host the RPC endpoint on port 9500, this will be a great way to check the health of your nodes behind a load balancer and take unhealthy nodes out of rotation.
Here you can check the status of Harmony Mainnet & Testnet:
If any BLS key(s) are detected signing conflicting blocks (i.e. blocks with the same height and view ID but with different block hashes), the validator will be slashed and forever banned from the network. When a validator is slashed, a certain percentage (i.e. slashing rate) of staked tokens from the validator and its delegators will be forfeited, of which half will be burnt and another half will be credited to the reporter of the double sign event.
The slashing rate is calculated by simply summing all the voting power of the double signing keys with a minimum of 2%. For example, if 3 BLS keys with voting power of 3%, 3% and 4% double signed at the same time, 10% of all staked tokens will be slashed on the validators who hold the 3 BLS keys.
The elected validators are obligated to validate blocks with their elected BLS keys. In every epoch, an elected validator should sign more than 2/3 of the signatures that its BLS keys are asked to sign.
The signing performance is represented by a percentage value called uptime. A validator’s uptime is the ratio of the number of signatures its elected BLS keys signed over the total number of signatures the keys should sign. For example, a validator has 2 elected BLS keys and each of the keys is presented 100 blocks to sign. In the final tally, the first key signed 70 blocks and the second key signed 80 blocks. Overall, the validator’s uptime is (70+80) / (100*2) = 75%.
At the end of each epoch, the validators with uptime of no more than 2/3 (66.66%) will have their status set to “Inactive” and be ruled out from the new election. For these inactive validators, they are required to manually set their status to “Active” by sending an EditValidator transaction in order to participate in future elections. We encourage validators to be proactive in maintaining a high uptime to ensure they remain elected and earn the most block reward possible.
Output example:
Make sure metrics are being exposed. For this check you can run:
Output example:
The example show below is for Prometheus 2.26.0. Change it accordingly to the version you have downloaded.
Open prometheus.yml configuration file:
Change the default port to 9900 and save the file:
Create prometheus systemd file:
Add the following to prometheus.service file:
You can now load Prometheus on your browser: http://Your_IP_Address:9090. You can run up or any other query to see if everthing is working as expected:
Make sure to enable and start Grafana server.
Once started, you should be able to load Grafana on your browser: http://Your_IP_Address:3000. Default user and password is admin.
Go to http://Your_IP_Address:3000/datasourcesand add Prometheu as datasource:
Go to http://Your_IP_Address:3000/dashboard/import and load the json file below:
Json file:
Once you save it you should see the dashboard loaded on Grafana:
Make sure you have Golang installed. For instructions on how to install here click . To make sure it is installed run correctly:
Download the latest version of Prometheus .
Follow instructions on how to download and install Grafana for your OS.
An overview of questions, additional resources, and products relating to Harmony’s Open Staking.
1. How to Stake Harmony ($ONE)?
You can participate in Harmony’s Staking either as a delegator or a validator.
For Delegators: For those wishing to participate in staking without running a validator, delegation is the best approach to still get involved and earn block rewards. Harmony ONE holders can delegate their tokens to existing validators using our staking explorer: https://staking.harmony.one/. If the tokens are delegated to an elected validator, a portion of the block reward earned by the validator will be credited to the delegator (according to section Block Reward).The earned block rewards are stored in a separate reward balance of the delegator, which can be immediately withdrawn to the delegator’s account balance. The block rewards can also be staked again to achieve the compounding effect of staking. Your delegated tokens are also associated with slashing risks of the validator. As a delegator, you should carefully choose validators based on their historical performance metrics such as APR, uptime and commission. In case of indifference or indecisiveness, you should distribute your delegations among multiple validators in order to minimize risk.
For Validators: Validators are invited to follow this Step by Step guide, to start earning staking rewards!
2. How to Stake Harmony ($ONE)?How much can I expect to earn?
While rewards are not fixed, and depend on the performance of a validator, the total staked tokens on the network, and the efficiency of the validator to follow Harmony’s Effective Proof of Stake, you can consult the following indicative figures.
Constant annual reward of 441M ONE regardless of changes in underlying variables such as block time and staking ratio
Transaction fees offset issuance creating a path to 0 issuance as protocol gains adoption
1st year yields range: 164% (at 5% staked) to 9% (at 95% staked)
For more in depth information, take a look at our spreadsheet model
3. What do the Total Stake values on the Staking Dashboard mean?
When you land on Harmony’s Staking dashboard, you see the list of Validators. There is a ‘Total Stake’ value on the top center. This value represents the total stake contributed to the network by ALL the validators, irrespective of whether they are currently elected in the top 800 available slots and signing blocks. This value includes stake from ALL validators created on the network.
In the Analytics section (staking.harmony.one/analytics), you see two tabs. The tab for ‘Last Epoch’ shows the results of the last election for the top 800 slots in the network. The total stake and effective median value in this section determine the validator list and block rewards for the current epoch. The tab for ‘Next Epoch’ shows the real-time snapshot values of total stake and effective median, which means that these values will be used for election right before the next epoch starts. You may notice that the total stake value in the ‘Last Election’ and ‘Next election’ may be different. This is because if a validator who got elected in the last election is not signing enough blocks, then they may not qualify for the upcoming election before the next epoch. As a result, their stake gets discounted in the ‘Next Election’ stake calculation.
4. Why is the ‘Expected Return’ value 0 for validators?
The Expected return value will start to show real non-zero values after a validator completes one full epoch after getting elected. This is because when a validator gets elected for the first time, there is no historical data to estimate expected returns.
5. What does Lifetime reward mean?
Lifetime reward means the total cumulative ONE earned by that validator.
6. I delegated and my validator is earning, but I can’t see my reward. Why?
Check for your rewards earned in the Portfolio page of the staking dashboard.
7. I sent 1 ONE to the dashboard but it’s not showing
When you send 1 ONE, what you will get is 0.99 ONE due to transaction fee. However, the staking dashboard doesn’t support decimal places currently.
8. Is reward per validator/delegator fixed?
No, a validator's rewards is dependent on their effective stake and their uptime during the epoch.
9. I want to undelegate my token, how long do I have to wait?
Your undelegated tokens will be available in your wallet after 7 epochs have passed.
10. My validator was not elected, can I undelegate and stake to another validator?
Yes, however you will have to wait for your tokens to be available at the end of the epoch.
11. How can I change my wallet password?
Ensure you have access to your seed phrase or private key first. Uninstall the extension, go to chrome store and reinstall. Launch the extension and choose the option to recover your account. Enter your seed or private key and input your new password.
12. Is there a window between epochs to delegate un-delegated tokens?
There is no window between epochs. Unfortunately, any delegations made after the tokens are available again will not be taken into account until the following epoch.
13. What does Fee mean?
The validators can charge a fee in order to offset the cost of running their validating nodes. The fee is automatically deducted from your rewards and included in the validator's rewards.
14. Why can't I claim rewards?
Rewards are claimed via a transaction, therefore you must have enough ONE tokens to pay the gas fee in order to claim your rewards.
15. What’s the minimum claim amount for delegators?
1 ONE.
16. What is the minimum stake amount for delegators?
100 ONEs.
17. How long does an epoch last?
It depends on the blocktime. Currently 1 epoch has 32768 blocks and with a 2s blocktime this is around 18.2 hours.
18. How do I check Mainnet network status?
We report all Mainnet network outages here. You can also check network status here.
Community developed Telegram bots to help monitor your validator
Below is a list of a few community run Telegram Bots to be used for monitoring of your Harmony Validator:
HMY Bidder helps you automate the BLS bidding on EPOS. It automatically adds or removes keys for your validator catching the median stake with the option to use leverage or not. Parameters can be set via configuration file.
| Name | Telegram Link | Instructions |
|---|---|---|
For instructions on how to set it up, please click .
Name
Link
Smart Stake - Harmony
Harmony Validator Community
KysenPool - Harmony
vStatsBot Uptime Alerts
Harmony Staking Manager
Harmony One Validator Bot
Harmony Network Monitoring
Harmony Alert Bot
Harmony Smart Stake Bot
Community developed Staking reward calculators
Name | Link |
Harmony Stake Calculator |
Mobile App for Validators
OS
Link
Android
iOS
Text based user interface for Harmony node.
Text based user interface for Harmony node. Below information is currently displayed on Harmony-TUI
Section - Harmony Blockchain - Connected peers - Leader's one address - Current epoch number - Recent timestamps of various stages
Section - Harmony Node - Harmony node binary version - ShardId of local node - Balance of user's one account
Section - Current Block - Current block number - Size of current block in bytes - Hash of current block - StateRoot - BlockEpoch - Number of signers who signed last block
Section - System Stats - CPU usage in percentage - Memory/RAM usage of system - Used disk space
Section - Validator Logs This section shows validator log file
Harmony node running on localhost:9000
Shared libraries required for running harmony node
Harmony TUI binary should be in same directory as harmony node binary
Build from source code
Clone repository - git clone git@github.com:harmony-one/harmony-tui.git
cd harmony-tui
Invoke make to build harmony-tui binary for local platform or make build-linux for linux
binary will get generated in ./bin directory
Copy harmony-tui binary from ./bin to the same directory as harmony node binary
Invoke binary - path_to_binary/harmony-tui --address=YOUR_ONE_ADDRESS
Download binary and run .
Download binary directly from here.
Place downloaded binary in same directory as harmony node binary
Invoke binary - path_to_binary/harmony-tui --address=YOUR_ONE_ADDRESS
Invoke binary - path_to_binary/harmony-tui --address=YOUR_ONE_ADDRESS
Help information - path_to_binary/harmony-tui--help
Command line arguments supported by harmony-tui binary
-address string
-env string
-version
Examples
Run binary - path_to_binary/harmony-tui --address=YOUR_ONE_ADDRESS --env=local
Check version - path_to_binary/harmony-tui --version
Termux is an Android terminal emulator and Linux environment app that works directly with no rooting or setup required
Download and Install the Termux app in the Playstore.
2. Run the app and install the SSH for the program by typing:
3. Setup your instance in the different cloud providers.
4. Connect your instance by using the Termux app and use the following command:
5. Click "yes" for authentication and retype again the command to access your instance. After that, type the unique password associated with your instance that comes from your cloud provider.
In Open Staking of mainnet, there will be 900 slots available for bidding. A slot represents membership in the network which gives the validator the right to use a specific BLS key to sign on blocks and the signature will be acknowledged by other validators.
After you create the validator record, the tokens you stake, along with any delegated tokens to your validator, will be automatically used to bid for the slots.
Each of the added BLS keys will create a unique bid for a slot in the network. The bid price equals the total stake on your validator divided by the total number of BLS keys attached to your validator.
Simply put, all tokens staked to the validator will be equally divided into each BLS key and each key bids separately. For example, a validator with a total stake of 300 ONE and 3 associated BLS keys will have 3 bids each with a bid price of 100 ONE.
The election for the slots works as follows.
Before the start of an epoch, all validator bids are ranked by bid price in descending order.
The highest 900 bids will be awarded the slots in the upcoming epoch.
The BLS key that successfully bids for a slot is deemed elected. Elected BLS keys will eventually form the committees of the shards. A validator in possession of at least one elected BLS key is also deemed elected.
Above is a simple example of bidding and election process with 10 slots and 5 validators.
For each of the blocks produced and confirmed within a shard, it should contain signatures from the keys with more than 2/3 of the total voting power of the shard committee. Each confirmed block will produce 7 ONE as block reward for the validators behind the committee. The 7 ONE is initially allocated to all the validators whose BLS key(s) signed on the block, proportionally to the voting power of the key(s) that signed.
The allocated block reward for a validator will be further distributed to delegators proportionally to their stake after the commission fee is charged. For example, a validator with a commission rate of 25% got allocated 4 ONE for a block it signed. The validator staked 1000 ONE itself and it has 2 delegations each with 1000 ONE. The block reward distribution for this validator works as follows:
The commission fee of 1 ONE (4 ONE * 25%) is cut from the original reward and credited to the validator.
The rest of the reward of 3 ONE is then distributed to all the stakers (including both the validator and its delegators) proportionally based on their stake. Since the stakers (the validator and the two delegators) each staked/delegated 1000 ONE, they each receive 1 ONE in the reward distribution.
For more information about block reward, please read our token economics model.
To launch your Digital Ocean instance, follow the steps below.
For new users, you can get $100 dollars free credits to run Digital Ocean services for 2 months using the link bellow
Click here to register a new Digital Ocean account or login if you have an existing one.
Once you have set up and logged into your Digital Ocean account, click on the top left bar “Projects -> New Project". Enter the desired project name and click on "Create Project" as shown by the image below:
On the top right corner click on "Create"->"Droplets".
Choose now your desired Linux image. We recommend the latest LTS version of Ubuntu (18.04 as of date of now). Use the left and right arrows to navigate between the different plans available. Choose the "Standard" plan and then select a virtual machine with at least 4 CPUs, 4GB of RAM and 80GB SSD accordingly to the minimum requirements.
You can select the datacenter region of your choice here. We chose "Frankurt" in our example. We recommend using the "SSH Keys" as your authentication method (more secure) instead of the "One-time password" method. A button with the name "New SSH key" will appear on screen, just click on it.
To create your SSH key click here for instructions.
When you generated your public SSH key, give it a name and click on button "Add SSH key" as shown by the image below. In case you don't have a public SSH key yet, just follow the instructions to create it.
Choose a custom hostname if you want and then click on "Create Droplet".
Wait a few seconds till your droplet is created and then click on "Networking" on the left bar.
Click on "Firewall" and then on "Create Firewall".
In the Inbound Rules section, click on "New rule" and select "Custom". Leave the protocol as TCP and fill the port range field with 6000. Repeat the same procedure for port 9000. You will be left with 2 inbound rules as shown by the image below.
In the Outbound Rules section leave it as it is. Type the name of the droplet you want to apply your firewall rules (the droplet name is the same as your hostname you chose previously).Click now on "Create Firewall".
To connect via SSH to your Digital Ocean instance, please follow the instructions here.
Before anything, it is recommended to update your system:
You will be asked to confirm if you would like to download and install these packages. Just press Y to confirm.
To launch your Google Cloud instance, follow the steps below.
Google Cloud has a free tier for new users. You get $300 to spend on Google Cloud Platform products during your first 12 months
Go to https://cloud.google.com/free and click on “Get Started for Free”. Login using an existing account or create a new one.
After you login and validate your credit card, you will be shown a page pretty much like this one. Click on “Compute Engine” and then in “VM Instances”.
Click on the Create button to make a new instance
We recommend to name it something like "pangaea” (the instance name cannot be changed). Select the Machine type as “Custom” and set up 4 vCPU’s and 4GB of Memory.
Keep everything default after you have configured the cores and memory.
For the Boot Disk, we recommend the latest LTS version of Ubuntu (18.04 as of date of now). Change the boot disk size to the minimum storage requirements.
Click Create. Please wait a few minutes for your instance
Once the instance is created. We will open 4 ingoing ports. To do this click on "nic0" as shown below. In the next page click on “Firewall rules” and after that on “CREATE FIREWALL RULE”.
TCP 6000
TCP 9000
Go back to the VM instances page and click on SSH. This will open a new window and connect via SSH to your instance:
Before anything, it is recommended to update your system:
You will be asked to confirm if you would like to download and install these packages. Just press Y to confirm.
To launch your Vultr instance, follow the steps below.
First, go to the Vultr Main Page. If you don’t already have an Vultr account, register one by clicking on "Sign up". Otherwise, log into your Vultr Account by clicking on "Sign in".
Once logged in, you'll want to add a new instance. Depending on whether your account is new or not, you may or may not have a Products page.
If you already have an instance, click the "+" button to deploy a new server. You can also use this link to go to the deploy page.
Otherwise, your Products page will be already link you to the Deploy page.
For Harmony, two instance types would fit: Cloud Compute and High Frequency.
Choose now your desired server type. We recommend the latest LTS version of Ubuntu (18.04 as of date of now).
Harmony recommends one of the two following accordingly to the minimum requirements:
You can now set the name of your server, e.g. PangaeaNode Then you should click "Deploy Now".
At this point you should be back on the Products page and your server should be installing. However, the setup isn't completely done, as you need to still create a firewall.
As we want to allow other nodes to connect to yours, we have to open the correct ports.
Once you are on the Firewall page, click Add Firewall Group.
Enter a name for the firewall group, e.g. FoundationNode.
TCP 22 (SSH)
TCP 6000
TCP 9000
Make sure to check that 3 Group Rules have been set.
Click Linked Instances.
Make sure your new server is selected.
Click the + button.
Click Add Linked Instance.
Your instance should now be added to the firewall group and the number of linked instances should increment by 1.
You can now go back to the Products page and your server is now successfully set up!
Follow the instructions below accordingly to the operating system you are connecting from:
Before anything, it is recommended to update your system:
You will be asked to confirm if you would like to download and install these packages. Just press Y to confirm.
How to delegate tokens to a validator
You can delegate tokens to a validator using the following command:
The CLI will ask for the passphrase for the delegator-addr keystore file.
--delegator-addr is the ONE address of the delegator (string)
--validator-addr is the ONE address of the validator (string)
--amount is the number of ONE tokens to delegate to the validator (float)
As a validator, if you want to increase your stake, you will have to delegate to yourself. For delegating to your own validator, delegator-addr and validator-addr will be the same.
This option is deprecated and is not supported anymore. Please setup your node Using Node Binary.
Before we proceed to next steps we need to download the necessary files:
Check the node binary and node.sh version that was downloaded:
You can run your the node using flags parsing:
A full list of active flags as well as examples can be access through running node.sh with --help option:
Output:
On this example, we will be installing the harmony daemon for user harmony on its home directory. Daemon will be configured with sudobut it will run with the harmonyuser at the end.
Create the harmony.service file:
Add the content below to the file and save it. Change User to the local user you will be running the daemon and also WorkingDirectory to the home directory where you downloaded the harmony binary file previously. Parameter ExecStart needs to point to this same directory. On the example below we will be running node.sh using parameters -S and -z.
Give the necessary permissions to run the daemon service, enable it and start it:
If you want to check the status of the daemon you can use:
To restart, or stop the service daemon you can run:
To check your node follow instructions on Checking A Node.
How to see your current validator information
You can check your validator’s information using the CLI with the following command:
If your validator does not sign more than 2/3 of the blocks in an epoch, the validator will be removed from the pool of eligible validators.
In order to be included in the pool again, you will have to use send an Edit Validator transaction with --active true.
Before we proceed, we need to create a new Validator Wallet which will need to be funded with 10001 ONE
You need to provide a local account name of your choice and provide a passphrase. When creating an account, the CLI will ask you to provide a passphrase to encrypt the keystore file: ./hmy keys add [LOCAL ACCOUNT NAME] --passphrase example :
Remember your passphrase. You will need it to decrypt the account keystore in order to send transactions & perform other actions.
Also save your seed phrase (mnemonic) somewhere as well, in case you lose your keystore.
The command above will return the location of your account keystore. You may want to create a backup of this file.
You can check the list of wallets (local accounts) with the following command:
Example output from above command:
Use the following command to check your balance : ./hmy --node="[API_endpoint]" balances [ONE ADDRESS] ex:
For you to create a Validator successfully, it needs to have 10000 ONE tokens plus the necessary fees to create the validator transaction on chain. For this reason, we recommend that you send at least 10001 ONE tokens to your --validator-addrbefore you continue.
For Testnet tokens, check here.
Replace everything in [ ] with your own data:
Copy the entire command. Extra white spaces in the command could cause errors.
Name, identity, details, security-contact and website need to be put in double quotes if there are more than one word separated by space (example --name "John the validator").
The CLI will prompt you to enter your BLS key file password.
--validator-addr is the validator ONE address (string)
--amount is the initial amount of ONE you want to stake (float)
--bls-pubkeys takes a comma-separated list of BLS public keys (string)
--name will be the name displayed on the Staking Explorer (string)
--identity unique identifier for the validator (string)
--details is the description of the validator (string)
--security-contact is security contact for the validator (string)
--website will be the website displayed on the Staking Explorer (string)
--max-change-rate is the maximum rate change the validator can do to their commission rate every epoch (float)
--max-rate is the maximum commission rate that the validator can set (float)
--rate is the commission rate of the validator (float)
--max-total-delegation is the maximum amount of ONE that can be delegated to this validator (float)
--min-self-delegation is the minimum amount of ONE the validator must stake to itself (float)
--max-rate and --max-change-rate cannot be changed later.
--min-self-delegation has to be at least 10,000 ONE.
--rate, --max-rate, and --max-change-rate accepts numbers between 0 and 1 representing percentages
If you have a Keybase account, we recommend you use your Keybase public key fingerprint as your validator's identity. The field is unique, ensuring that other validator's can not attempt to impersonate you. This data will also help with some awesome integrations & features in the future!
Reasons why your validator is not elected & how to get elected.
TL;DR Validators are elected based on their effective stake, instead of their absolute stake. The effective stake is calculated based on the median stake in the network. The top 900 BLS keys with the highest effective stake will be elected for the epoch.
The value returned by the CLI is in Atto, which is equivalent to Gwei in Ethereum.
We recommend that you start bidding above or around the median stake, so you are likely to always stay elected each epoch.
Run the command below:
Output:
If not eligible, activate it for the next epoch election:
Run the command below:
Output:
For your validator to stay elected, you wanna make sure the current-epoch-signing-percentage is above 66% (0.66).
To fix the above, we have to make sure the node is working correctly and below are few pointers
Compare your node block height with the network block height.
Check your node block height:
Check the network block height:
Make sure network height and your current height are very close or equal. Additionally if your node is validating for a
The above command is for network height on shard 0, change s0 to s1, s2, .. to match the shard you want to check.
When you are fully synced and your validator profile is satisfactory you should start having BINGOs in your validator log file at epoch change.
You can check BINGOs via this command:
And you’ll notice in your validator information that you started signing blocks.
Output:
If you fail to sign blocks, verify your machine/vps doesn't have CPU/memory/hard disk/internet issues. When you fail to sign more than 66% of the blocks in an epoch, you’ll be kicked out from the committee.
Harmony operates with Effective Proof of Stake (EPoS) to keep the network security from collecting in the hands of a few validators. You can find our full Medium article on EPoS !
Visit <youroneaccount>
Example :
Your Total Staked divided by the number of BLS keys you set on your validator will give you the effective bidding stake. This effective bidding stake will be used to bid in the 900 slots available each epoch. Bidding above the median stake is the safest way to get your keys elected each epoch. Bidding below the median stake is riskier, as you may be kicked out of the committee for 1 epoch in case you outbid. For more information on the bidding process check .
If the above doesn’t work and you have an error message similar to this: commit: v304-0e26945, error: dial tcp4 127.0.0.1:9500: connect: connection refused It means the harmony node binary is not running. Please follow this documentation on .
This option is deprecated and is not supported anymore. Please update your node Using Node Binary.
Create a folder called "backup" in case it does not exist:
Backup both node.sh and harmony binary file:
Before we proceed to next steps we need to download the necessary files:
Check the Binary CLI and node.sh version that was downloaded:
To check your node follow instructions on Checking A Node.

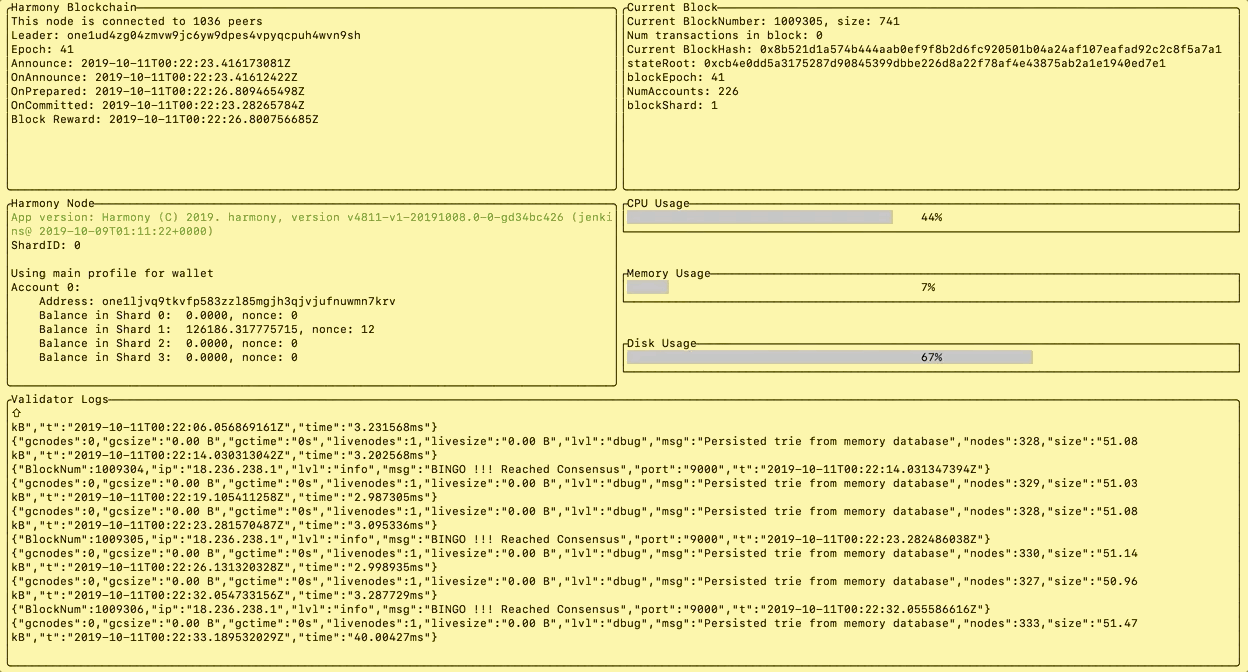