Using IPFS

This tutorial will show how to use IPFS on harmony blockchain

Context

Harmony blockchain can be used to store data. But is it really worth the cost? To put into perspective 1 byte of a data can cost you 42,107 gas or 0.00042017 ONE token, or equal to about $0.00003092031 in today's market. It maybe small for just one byte of data but let's say you want to store a file with 1 GB data (1,000,000,000 bytes) it will cost you $30920.31. The solution is IPFS, the InterPlanetary File System.

What is IPFS?

IPFS is a distributed system for storing and accessing files, websites, applications, and data. Using IPFS as a storage you don't need to store entire files to harmony blockchain you just need to store the hash of the IPFS to the harmony blockchain, thus make it much more cheaper then just storing the file.

In this tutorial, we are going to use IPFS to store some files offchain and store the hash of the file to the blockchain. And we will also get the data back from blockchain, and show it to the webpage.

https://www.youtube.com/watch?v=AUzmku4xQLw

https://github.com/harmony-one/harmony-ipfs

Prerequisites

In this entire tutorial i'm using windows 10, but you can use any other os.

Step 1 - Install IPFS

To install IPFS on your machine, there are so many ways to do it. You can see for yourself here https://docs.ipfs.io/install/command-line/#official-distributions. After that go to your command prompt and type:

ipfs config --json API.HTTPHeaders.Access-Control-Allow-Origin "["""webui://-""", """http://localhost:3000""", """http://127.0.0.1:5001""", """https://webui.ipfs.io"""]"

ipfs config --json API.HTTPHeaders.Access-Control-Allow-Methods "["""PUT""", """POST"""]"

This command needed so that we can upload our file without any CORS problem. After that run this command to run ipfs locally:

ipfs daemon

Step 2 - Install Metamask

There is also so many way to download metamask. If you're using chrome you can download it from here https://metamask.io/download.html, and click on install metamask for chrome after you install the metamask you need to setup the metamask so that it can interact with harmony blockchain click on Custom RPC like below :
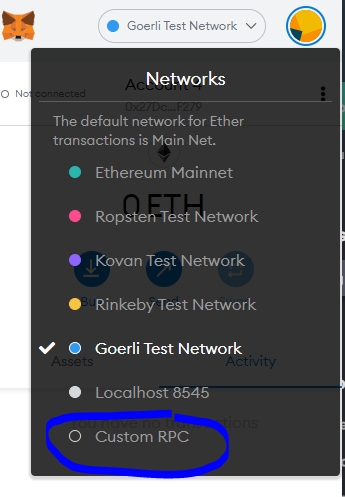
networks

Then after that write this one by one:

Network Name :
Harmony Testnet

New RPC URL :
https://api.s0.b.hmny.io

Chain ID :
1666700000

Currency Symbol :
ONE

Block Explorer URL :
https://explorer.pops.one/

Now you have an harmony one account on metamask testnet we need to fill some harmony one token you can do that by going to harmony one testnet faucet like this one https://faucet.pops.one/, to get your address click on the three dot and click on view in explorer like this :
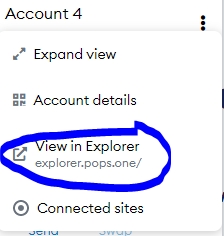
explorer

you will then get your address like this :

s

Put it in the harmony testnet faucet and click send me and you will get your harmony one token filling up.

Step 3 - Create a smart contract

First we need to install truffle. To install truffle go to your command prompt and type:

npm install -g truffle

Now create a folder and go inside that folder and type on the command prompt:

truffle init

After you run that command basically you will get some file and folder like this:

contracts/  migrations/  test/  truffle-config.js

So now i want you to go to contract folder and create a file called IPFSstorage.sol and paste this code in that file:

pragma solidity 0.8.6;
contract IPFSstorage {
 string ipfsHash;

 function sendHash(string memory x) public {
   ipfsHash = x;
 }

 function getHash() public view returns (string memory x) {
   return ipfsHash;
 }
}

So this is actually a really basic smart contract with the purpose of storing the hash of the file to the blockchain. sendHash is to store the hash, and getHash is to get the hash. After that go to the migrations folder and create a file called 2_ipfs_storage_migration.js and paste this code into that file :

var IPFSstorage = artifacts.require("./IPFSstorage.sol");

module.exports = function(deployer) {
    // Demo is the contract's name
    deployer.deploy(IPFSstorage);
};

This code is basically used for deploying our contract to our testnet later using truffle. Now go back to the root of our folder and look for truffle-config.js file and replace the code inside of that file with this :

require('dotenv').config()

const PrivateKeyProvider = require('./private-provider')

const networkId = {
  Mainnet: 1666600000,
  Testnet: 1666700000
}

module.exports = {
  networks: {
    localnet: {
      provider: () => {
        return new PrivateKeyProvider(process.env.LOCALNET_PRIVATE_KEY, 'http://localhost:9500', networkId.Testnet)
      },
      network_id: networkId.Testnet
    },

    testnet: {
      provider: () => {
        return new PrivateKeyProvider(process.env.TESTNET_PRIVATE_KEY, 'https://api.s0.b.hmny.io', networkId.Testnet)
      },
      network_id: networkId.Testnet
    },

    mainnet: {
      provider: () => {
        return new PrivateKeyProvider(process.env.MAINNET_PRIVATE_KEY, 'https://api.s0.t.hmny.io', networkId.Mainnet)
      },
      network_id: networkId.Mainnet
    }
  },

  compilers: {
    solc: {
      version: '0.8.6'
    },
  }
}

After that create a file called private-provider.js and copy paste this code :

const ProviderEngine = require('@trufflesuite/web3-provider-engine');
const WalletSubprovider = require('@trufflesuite/web3-provider-engine/subproviders/wallet');
const RpcSubprovider = require('@trufflesuite/web3-provider-engine/subproviders/rpc');
const EthereumjsWallet = require('ethereumjs-wallet');

// ChainIdSubProvider
function ChainIdSubProvider(chainId) {
  this.chainId = chainId;
}
ChainIdSubProvider.prototype.setEngine = function (engine) {
  const self = this;
  if (self.engine) return;
  self.engine = engine;
};
ChainIdSubProvider.prototype.handleRequest = function (payload, next, end) {
  if (
    payload.method == 'eth_sendTransaction' &&
    payload.params.length > 0 &&
  typeof payload.params[0].chainId == 'undefined'
  ) {
    payload.params[0].chainId = this.chainId;
  }
  next();
};

// NonceSubProvider
function NonceSubProvider() { }
NonceSubProvider.prototype.setEngine = function (engine) {
   const self = this;
   if (self.engine) return;
   self.engine = engine;
};
NonceSubProvider.prototype.handleRequest = function (payload, next, end) {
  if (payload.method == 'eth_sendTransaction') {
    this.engine.sendAsync(
    {
      jsonrpc: '2.0',
      id: Math.ceil(Math.random() * 4415011859092441),
      method: 'eth_getTransactionCount',
      params: [payload.params[0].from, 'latest'],
    },
    (err, result) => {
      const nonce =
        typeof result.result == 'string'
          ? result.result == '0x'
            ? 0
            : parseInt(result.result.substring(2), 16)
          : 0;
      payload.params[0].nonce = nonce || 0;
      next();
    });
  } else {
    next();
  }
};

// PrivateKeyProvider
function PrivateKeyProvider(privateKey, providerUrl, chainId) {
  if (!privateKey) {
    throw new Error(
      `Private Key missing, non-empty string expected, got "${privateKey}"`
    );
  }

  if (!providerUrl) {
    throw new Error(
      `Provider URL missing, non-empty string expected, got "${providerUrl}"`
    );
  }

  this.wallet = EthereumjsWallet.default.fromPrivateKey(Buffer.from(privateKey, 'hex'));
  this.address = `0x${this.wallet.getAddress().toString('hex')}`;

  this.engine = new ProviderEngine({ useSkipCache: false });

  this.engine.addProvider(new ChainIdSubProvider(chainId));
  this.engine.addProvider(new NonceSubProvider());
  this.engine.addProvider(new WalletSubprovider(this.wallet, {}));
  this.engine.addProvider(new RpcSubprovider({ rpcUrl: providerUrl }));

  this.engine.start();
}

PrivateKeyProvider.prototype.sendAsync = function (payload, callback) {
  return this.engine.sendAsync.apply(this.engine, arguments);
};

PrivateKeyProvider.prototype.send = function () {
  return this.engine.send.apply(this.engine, arguments);
};

module.exports = PrivateKeyProvider;

Now create a file called package.json and copy paste this code :

{
  "name": "harmony-box",
  "version": "1.0.0",
  "dependencies": {
    "@openzeppelin/contracts": "^3.4.0",
    "@trufflesuite/web3-provider-engine": "^15.0.13-1",
    "ethereumjs-wallet": "^1.0.1",
    "dotenv": "^8.2.0",
    "truffle": "^5.1.66",
    "solc": "^0.7.6"
  }
}

And run npm install to install all the dependencies. Now create a file called .env and copy paste this code :

LOCALNET_PRIVATE_KEY='ENTER_PRIVATE_KEY_HERE'
TESTNET_PRIVATE_KEY='ENTER_PRIVATE_KEY_HERE'
MAINNET_PRIVATE_KEY='ENTER_PRIVATE_KEY_HERE'

Because we are gonna use testnet, we need to get our private key and set it in the .env file, on the TESTNET_PRIVATE_KEY variable. Let's go to the metamask and get our private key. Click the three dot again and click account detail and click export private key :

export

After you input your password you should see your private key, after that just copy past it in the .env file, on the TESTNET_PRIVATE_KEY variable. After that to deploy our smart contract you just need to run this command :

truffle migrate --network testnet --reset

Wait for it to complete and then you will get a contract address like this :

contract address

Save that contract address in the safe place, because we will need it in the next step.

Step 4 - Integrating IPFS + Harmony Blockchain

First thing first, we need to create a react application to communicate with the harmony blockchain and IPFS, much more easily, we gonna use nextjs framework for this one so to create it first we need to run this command :

npx create-next-app harmony-ipfs --use-npm --example "https://github.com/vercel/next-learn-starter/tree/master/learn-starter"

It will create a new directory called harmony-ipfs and install all the dependencies for you. We also need to style our app with some css, so we gonna use chakra-ui for this. Go inside the harmony-ipfs directory and install the dependencies :

npm i @chakra-ui/react @emotion/react@^11 @emotion/styled@^11 framer-motion@^4 ipfs-http-client

After that create a directory called abi and copy paste the abi file called IPFSstorage.json from build/contracts folder on the root of the project.

Now go inside pages folder and create a file called _app.js and copy paste this code :

import { ChakraProvider } from "@chakra-ui/react"

function MyApp({ Component, pageProps }) {
  return (
    <ChakraProvider>
      <Component {...pageProps} />
    </ChakraProvider>
  )
}

export default MyApp

Now go to index.js and replace the code with this one :

import Head from 'next/head'
import { Container } from "@chakra-ui/react";
export default function Home() {
  return (
    <Container>
      <Head>
        <title>IPFS + Harmony</title>
        <link rel="icon" href="/favicon.ico" />
      </Head>
    </Container>
  )
}

Add all of the import first below import { Container } from "@chakra-ui/react"; :

import { Button } from "@chakra-ui/react";
import { Center } from "@chakra-ui/react";
import Web3 from "web3";
import {
  Table,
  Thead,
  Tbody,
  Tr,
  Th,
  Td 
} from "@chakra-ui/react";
import {useRef,useState, useEffect} from "react"
import { create } from 'ipfs-http-client'
import IPFScontract from "../abi/IPFSstorage.json"

Let's create all the state that we need so that our application can function properly, below export default function Home() { copy paste this code :

const [inputFile,setInputFile]=useState(null)
  const [ethereumEnabled,setEthereumEnabled]=useState(false)
  const [web3,setWeb3]=useState(null)
  const [transaction,setTransaction]=useState(null)
  const [ipfsHash,setIpfsHash]=useState(null)

And then let's create a function that can be used for later to connect to our metamask put it below the state :

const ethEnabled = async () => {
    if (window.ethereum) {
      await window.ethereum.send('eth_requestAccounts');
      setWeb3(new Web3(window.ethereum))
      setEthereumEnabled(true)
      return true;
    }
    setEthereumEnabled(false)
    return false;
  }

And then let's create some code that can trigger the choose file button and also upload to ipfs :

 const fileInput = useRef(null); // trigger choose file button for later
  const client = create('http://localhost:5001/api/v0') // function to create a client to upload to ipfs later
  async function onChange(e){ // function to detect file change
    const file = e.target.files[0]
    setInputFile(file)  
  }

Let's create a function that can be used to upload the file to ipfs and harmony blockchain :

  async function uploadFileToIPFS(file){
    try {
      const added = await client.add(file)
      let contract = new web3.eth.Contract(IPFScontract.abi, "<contract address>")
      const from=(await web3.eth.getAccounts())[0]
      const contractTransaction=await contract.methods.sendHash(added.path).send({ from })
      setTransaction(contractTransaction)
      console.log(contractTransaction)
   setInputFile(null)

    } catch (error) {
      console.log('Error uploading file: ', error)
      return false

    }  
  }

If you remember before you save the contract address of IPFSstorage contract right replace <contract address> with your saved contract address, then after that let's create a function that can be used to get the hash of the file that we uploaded to IPFS :

async function getIPFSHash(){
    try {

      let contract = new web3.eth.Contract(IPFScontract.abi, "<contract address>")
      const contractIpfsHash=await contract.methods.getHash().call()
      setIpfsHash(contractIpfsHash)

    } catch (error) {
      console.log('Error getting hash: ', error)
      return false

    }  
  }

Last but not least, create a html that can be used to upload and display our blockchain transaction also our ipfs hash that we get from harmony blockchain copy paste this code below </Head> tag :

<input
      ref={fileInput}
        type="file"
        style={{visibility:"hidden"}}
        onChange={onChange}
      />
      <Center mt="10px"><b>Upload file to ipfs and harmony blockchain</b></Center>
      <Center h="100px" color="white">
      {!ethereumEnabled?<Button colorScheme="blue" onClick={()=>ethEnabled()}>Login with metamask</Button>:<Button colorScheme="orange">Logout</Button>}


      </Center>
      <Center style={{display:!ethereumEnabled?"none":"flex"}} h="100px" color="white">

        <Button colorScheme="blue" onClick={()=>fileInput.current.click()}>{inputFile?inputFile.name:"Choose File"}</Button>


      </Center>
      <Center style={{display:!ethereumEnabled||!inputFile?"none":"flex"}} h="100px" color="white">
        <Button colorScheme="green" onClick={()=>uploadFileToIPFS(inputFile)}>Upload File</Button>
      </Center>
      <Center style={{display:!ethereumEnabled||!transaction?"none":"flex"}}><b>Transaction Detail</b></Center>
      <Table style={{display:!ethereumEnabled||!transaction?"none":""}} variant="simple">
        <Thead>
          <Tr>
            <Th>Key</Th>
            <Th>Value</Th>
          </Tr>
        </Thead>
        <Tbody>
          <Tr>
            <Td>Transaction Hash</Td>
            <Td>{transaction?.transactionHash}</Td>

          </Tr>
          <Tr>
            <Td>Status</Td>
            <Td>{transaction?.status}</Td>

          </Tr>
          <Tr>
            <Td>Gas Used</Td>
            <Td>{transaction?.gasUsed}</Td>

          </Tr>
          <Tr>
            <Td>Block Number</Td>
            <Td>{transaction?.blockNumber}</Td>

          </Tr>
          <Tr>
            <Td>Block Hash</Td>
            <Td>{transaction?.blockHash}</Td>

          </Tr>
        </Tbody>

      </Table>
      <Center style={{display:!ethereumEnabled||!transaction?"none":"flex"}} h="100px" color="white">

        <Button colorScheme="blue" onClick={()=>getIPFSHash()}>Get IPFS URL</Button>


      </Center>
      <Center><a target="_blank" href={ipfsHash?`http://localhost:8080/ipfs/${ipfsHash}`:"#"}>{ipfsHash?`http://localhost:8080/ipfs/${ipfsHash}`:""}</a></Center>

This is our final code of index.js file :

import Head from 'next/head'
import { Container } from "@chakra-ui/react";
import { Button } from "@chakra-ui/react";
import { Center } from "@chakra-ui/react";
import Web3 from "web3";
import {
  Table,
  Thead,
  Tbody,
  Tr,
  Th,
  Td 
} from "@chakra-ui/react";
import {useRef,useState, useEffect} from "react"
import { create } from 'ipfs-http-client'
import IPFScontract from "../abi/IPFSstorage.json"
export default function Home() {
  const [inputFile,setInputFile]=useState(null)
  const [ethereumEnabled,setEthereumEnabled]=useState(false)
  const [web3,setWeb3]=useState(null)
  const [transaction,setTransaction]=useState(null)
  const [ipfsHash,setIpfsHash]=useState(null)
  const ethEnabled = async () => {
    if (window.ethereum) {
      await window.ethereum.send('eth_requestAccounts');
      setWeb3(new Web3(window.ethereum))
      setEthereumEnabled(true)
      return true;
    }
    setEthereumEnabled(false)
    return false;
  }
  const fileInput = useRef(null); // trigger choose file button for later
  const client = create('http://localhost:5001/api/v0') // function to upload to ipfs
  async function onChange(e){ // function to detect file change
    const file = e.target.files[0]
    setInputFile(file)  
  }
  async function uploadFileToIPFS(file){
    try {
      const added = await client.add(file)
      let contract = new web3.eth.Contract(IPFScontract.abi, "<contract address>")
      const from=(await web3.eth.getAccounts())[0]
      const contractTransaction=await contract.methods.sendHash(added.path).send({ from })
      setTransaction(contractTransaction)
      console.log(contractTransaction)
   setInputFile(null)

    } catch (error) {
      console.log('Error uploading file: ', error)
      return false

    }  
  }
  async function getIPFSHash(){
    try {

      let contract = new web3.eth.Contract(IPFScontract.abi, "<contract address>")
      const contractIpfsHash=await contract.methods.getHash().call()
      setIpfsHash(contractIpfsHash)

    } catch (error) {
      console.log('Error getting hash: ', error)
      return false

    }  
  }
  return (
    <Container>
      <Head>
        <title>IPFS + Harmony</title>
        <link rel="icon" href="/favicon.ico" />
      </Head>
      <input
      ref={fileInput}
        type="file"
        style={{visibility:"hidden"}}
        onChange={onChange}
      />
      <Center mt="10px"><b>Upload file to ipfs and harmony blockchain</b></Center>
      <Center h="100px" color="white">
      {!ethereumEnabled?<Button colorScheme="blue" onClick={()=>ethEnabled()}>Login with metamask</Button>:<Button colorScheme="orange">Logout</Button>}


      </Center>
      <Center style={{display:!ethereumEnabled?"none":"flex"}} h="100px" color="white">

        <Button colorScheme="blue" onClick={()=>fileInput.current.click()}>{inputFile?inputFile.name:"Choose File"}</Button>


      </Center>
      <Center style={{display:!ethereumEnabled||!inputFile?"none":"flex"}} h="100px" color="white">
        <Button colorScheme="green" onClick={()=>uploadFileToIPFS(inputFile)}>Upload File</Button>
      </Center>
      <Center style={{display:!ethereumEnabled||!transaction?"none":"flex"}}><b>Transaction Detail</b></Center>
      <Table style={{display:!ethereumEnabled||!transaction?"none":""}} variant="simple">
        <Thead>
          <Tr>
            <Th>Key</Th>
            <Th>Value</Th>
          </Tr>
        </Thead>
        <Tbody>
          <Tr>
            <Td>Transaction Hash</Td>
            <Td>{transaction?.transactionHash}</Td>

          </Tr>
          <Tr>
            <Td>Status</Td>
            <Td>{transaction?.status}</Td>

          </Tr>
          <Tr>
            <Td>Gas Used</Td>
            <Td>{transaction?.gasUsed}</Td>

          </Tr>
          <Tr>
            <Td>Block Number</Td>
            <Td>{transaction?.blockNumber}</Td>

          </Tr>
          <Tr>
            <Td>Block Hash</Td>
            <Td>{transaction?.blockHash}</Td>

          </Tr>
        </Tbody>

      </Table>
      <Center style={{display:!ethereumEnabled||!transaction?"none":"flex"}} h="100px" color="white">

        <Button colorScheme="blue" onClick={()=>getIPFSHash()}>Get IPFS URL</Button>


      </Center>
      <Center><a target="_blank" href={ipfsHash?`http://localhost:8080/ipfs/${ipfsHash}`:"#"}>{ipfsHash?`http://localhost:8080/ipfs/${ipfsHash}`:""}</a></Center>
    </Container>
  )
}

If you're successfully follow this tutorial you will get something like this :
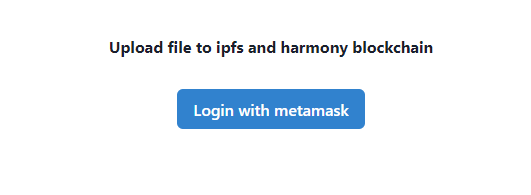
Let's click on login button and you will see something like this :
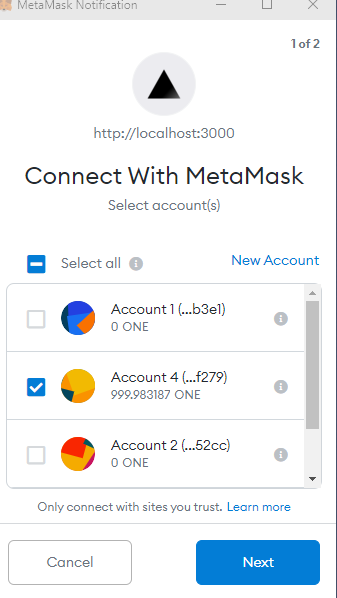
choose

Choose your account and click next and connect.

connected

If you see connected button like above you're successfully connected to the site.
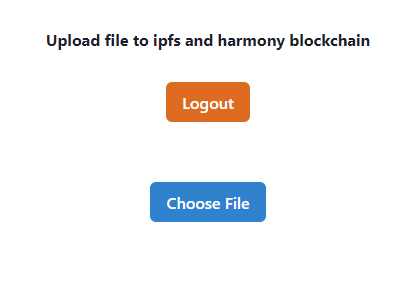
Click on choose file button and choose your file.
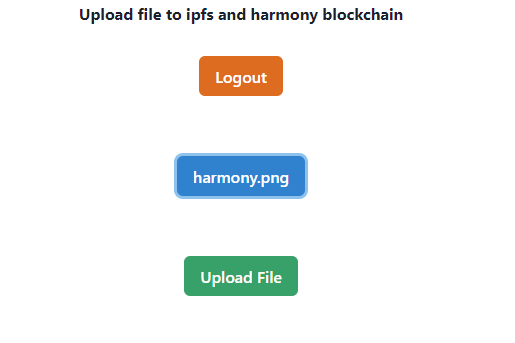
Click on upload file
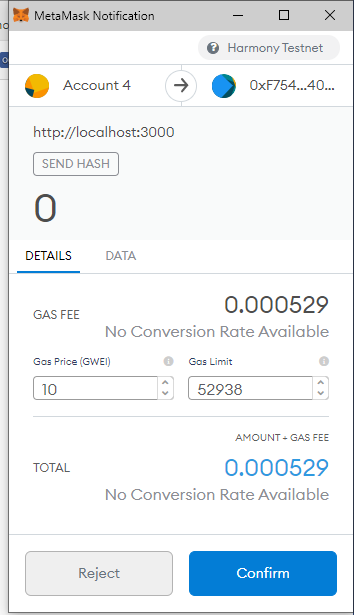
Click on confirm and wait for a while.
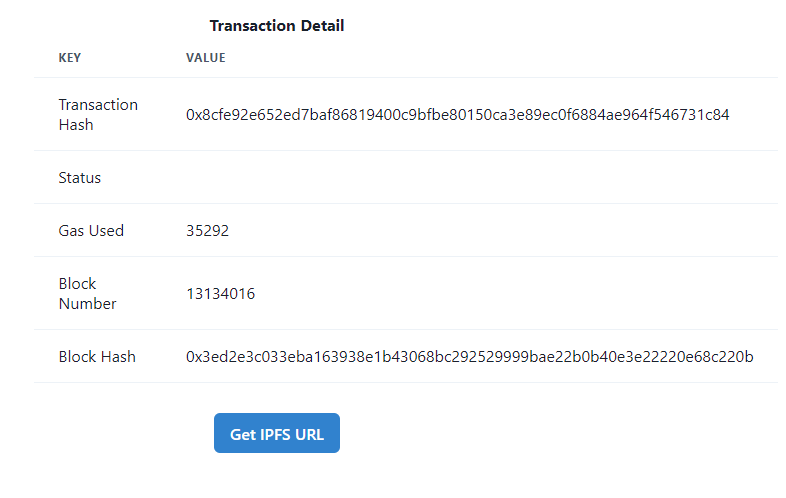
After that if you get your transaction detail you're successfully uploaded your file to IPFS and harmony blockchain.

If you click on "Get IPFS URL" you will get your IPFS URL.

Conclusion

Congrats! You're successfully uploaded your file to IPFS and harmony blockchain. This is just a simple use case to upload and get a file from harmony blockchain. You can be creative and create a more complex use case like NFT metadata storage or something like that. And if you notice we are using local IPFS node. Which means if our IPFS node is down, you can't get your file. One thing you can do is using service like infura it is a free with some limitation IPFS service. You can also automatically pin your file to infura by changing the localhost:8080 to ipfs.infura.io, and your file can be seen forever, but you can't unpin it so be careful when using infura to upload your private file. That's it for now if you have any questions or suggestions feel free to ask in Official Harmony Discord

Last updated